

Mini Ghoulish Spooks DIY
MINI GHOULISH SPOOKS | LEARN TO MAKE YOUR OWN CHEESECLOTH GHOSTS | BY MARITZAGARCIA.WEBSITE
Note: This post contains hyperlinks to other websites. Links are provided to the products I used for this project. All opinions on the products being used are my own. I have no affiliation with any of these companies. I use these products for all my DIY's and I love them. Also. You will NOT be redirected to other websites unless you choose to click on links.
With spooky season in full swing, it would be almost criminal not to deck the halls of any livable habitat with a few tiny not so spooky phantoms this time of year —wouldn't you agree?

If you like simple Halloween decor as much as I do. You're definitely going to like these little cheesecloth ghosties. Fun to make and super easy to complete in minutes. Now. Without any further ado. Let's get started and make some tiny cheesecloth ghost together.

YOU WILL NEED:
Styrofoam balls (I used 2" and 2.5")
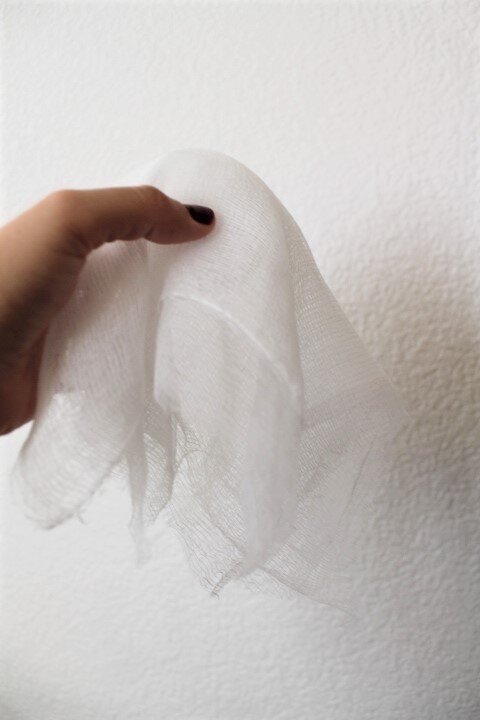
cheesecloth (dritz brand)
specialty needles (dritz brand)
pompoms (black assorted sizes)
felt glue (beacon brand)
fishing line (low stretch)
hole punch
scissors
cardstock (black) scraps will do

PROJECT TIME: 30 MINUTES or less.
INSTRUCTIONS:
STEP 1.
YOU WILL NEED TO CUT TWO 10" PIECES OF CHEESECLOTH FOR YOUR 2.5" SIZE STYROFOAM BALL AND THREE 8" PIECES OF CHESSECLOTH FOR YOUR 2" SIZE STYROFOAM BALL. NEXT, UNFOLD ALL 5 PIECES OF CHEESECLOTH. YOU WILL SEE 4 FOLD LINES DOWN THE CENTER OF EVERY SHEET. CUT EACH SHEET TO GET 4 INDIVIDUAL PIECES (AS SHOWN IN IMAGE).


STEP 2.
TAKE A STYROFOAM BALL AND DRAPE ALL FOUR SHEETS OF CHEESECLOTH OVER STYROFOAM BALL. REPEAT THIS STEP UNTIL ALL STYROFOAM BALLS HAVE BEEN COVERED.


STEP 3.
TAKE A SPECIALTY NEEDLE. THREAD FISHING LINE TO DESIRED LENGTH AND KNOT. next. PIERCE STYROFOAM BALL FROM BOTTOM to TOP or vice versa- EITHER WAY IS fine. the main objective is to SECURe the fishing line at THE BOTTOM. I knotted my fishing line 4 TIMES. all my little ghost are holding up remarkably well indoors. however. if you plan on using your cheesecloth ghosties outdoors, YOU might want to add a small glob of hot glue to reinforce fishing line to the bottoms of each STYROFOAM BALL.


STEP 4.
GRAB YOUR (FELT) GLUE, HOLE PUNCH, PRECISION SCISSORS, BLACK CARDSTOCK, AND POMPOMS. DECIDE ON EYE AND MOUTH PLACEMENTS. AFTER HOLE PUNCHING my CARD STOCK I TOOK PRECISION SCISSORS TO CREATE LITTLE MOUTH EXPRESSIONS FOR EACH GHOST (THIS STEP IS OPTIONAL). ONCE YOU HAVE ALL your PIECES layed out. GLUE ON POMPOM EYES AND HOLD DOWN FOR A FEW SECONDS. NEXT, GLUE ON THE little MOUTHS, again HOLD DOWN FOR A FEW SECONDS. SET ASIDE and let GLUE FULLY DRY, ROUGHLY ABOUT 10 MINUTES.


STEP 5.
ONCE YOUR PROJECT HAS FULLY DRIED. it’s than time to HANG UP YOUR LITTLE SPOOKS AROUND THE HOUSE.
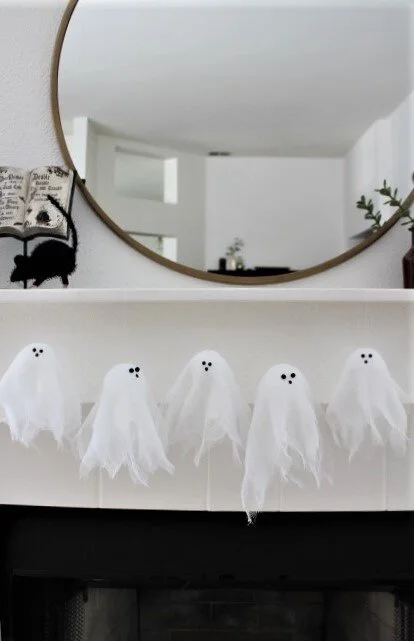


AS ALWAYS. I HOPE YOU GIVE THIS DIY A TRY, AND DON'T FORGET TO TAG ME IF YOU'RE ON INSTAGRAM using hashtag #KNOTJUSTPAPERDIY whenever RECREATing ANY OF MY DIY'S. I ABSOLUTELY LOVE SEEING how your PROJECTS turn out! UNTIL NEXT TIME — HAPPY CRAFTING!
-Maritza.

